Whether it’s due to the pandemic or simply because it’s more convenient and affordable, you’ve decided to record your podcast remotely.
The good news is, you don’t need to rent out a professional studio to produce and publish superstar content with high-quality audio — you can, in fact, yield quite similar results from your home! The better news? You don’t need to invest tons of money to pull this off.
We’ve put together a simple yet comprehensive guide about how you can assemble a five-star remote podcast recording setup in your home. The two key components? Your podcast equipment and the physical location you choose to record in.
The equipment you need to record a (remote) podcast
When recording your podcast from home, there are a few must-have pieces of equipment: a microphone, remote recording software (if conducting interviews — hey, we can help!) and headphones.
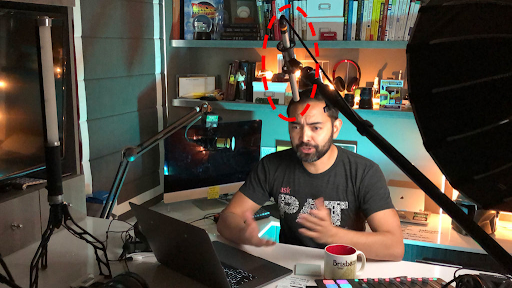
Pat Flynn of Smart Passive Income in his home recording studio
Source: https://patflynn.com/live-streaming-equipment-setup/
✅ Microphone
Trust me: You can produce the most captivating content possible, but if your listeners can’t hear you loud and clear, it won’t matter. Choosing a podcast microphone can be hard, as there are a slew of options out there — so many, in fact, you may develop a decision-making complex.
Smart Passive Income’s Pat Flynn and “The Podcast Host” Colin Gray both recommend The Samson Q2U. (It’s worth noting, though, that Pat uses a Rode NTG 2 when he records. It’s more expensive than the Samson Q2U.)
Evo Terra, creator and host of Podcast Pontifications, doesn’t generally recommend a specific mic. “I can’t tell you what microphone you should buy,” he says. “Different voices and environments necessitate different mic choices. What works well for me may not work well for you, for very good reasons.” It’s important that you do a little research and decide what’s best for you and your recording location. In case you’re curious, here’s the equipment Evo recommends, which includes an $89 mic option as well as a high-end $400 option.
Pat advises looking for a mic that’s easy to use, affordable and doesn’t require a lot of extra accessories. For simplicity’s sake, look for mics that can be plugged into your computer via a USB cord — like the Samson Q2U or the Blue Yeti (which I use and love, by the way).
Here are a few other things to consider in relation to the podcast mic you choose:
- Audio interface: If you decide to buy an XLR microphone (that’s the kind pros tend to use) instead of USB, you’ll need this piece of equipment in order to connect your mic to your computer.
- Mic stand: You don’t want to have to hold your mic in your hand while you record. Some mics (like the Blue Yeti) stand up on their own or come with a stand. If you want to position your mic in different ways like Pat and Colin, look into boom arms.
- Pop filter: Helps remove some of the “popping” sounds that occur when someone talks.
✅ Headphones

Source: https://elsieescobar.com
According to Mark Asquith (AKA “That British Podcast Guy”), while the quality of your headphones isn’t nearly as important as that of your mic, you still want to use good ones so you can clearly hear yourself, your guest and any errant background noise.
“Without them, it’s a lot harder to hear what people are saying, which can mean you release episodes that are in poor quality without knowing it,” Mark says. You’d be amazed at all the strange sounds I pick up while recording — like the tap of my foot or the turn of my notebook page — that I’d have no idea about if I recorded sans headphones. So do yourself (and your audience) a favor, podcast friends, and don’t record without headphones!
The question is: Which headphones?
Mark recommends noise cancelling over-the-head headphones, like one of these, and Evo uses these Sony headphones. But, honestly, I’ve used my Apple earbuds with a lightning connection and they’ve been perfectly sufficient. I do recommend against bluetooth earbuds, though. If you still need help choosing some, our friends at The Podcast Host rounded up their favorite options.
✅ Remote recording software
Recording solo? Then you can skip this step, as you can just record your voice directly onto your computer using a tool like GarageBand or Audacity, which you can then use to edit your episodes, too.
But if you’re interviewing guests remotely, you’ll need software to do so — otherwise it’ll be pretty darn hard to capture their audio. There are several options out there, and we have to humble brag here for a second — we thinkSquadCast is your best bet!
The audio quality is great (and SquadCast’s partnership with Dolby will make the audio experience even better), you can record the tracks separately, it’s affordable and since SquadCast enables you to see your guests and their facial expressions while chatting, it helps with the flow of your conversation too.
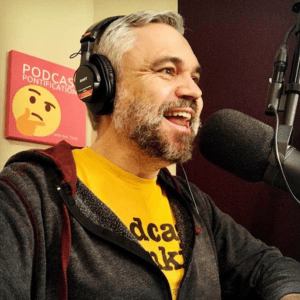
Evo Terra of Podcast Pontifications
Source: https://podcastpontifications.com/equipment-guide
Your at-home studio: Yes, it can sound professional
Once you’ve chosen your equipment, the next step is deciding where in your home to record. The main goal is to find a space that’s as quiet and free of background noise as possible.
Choosing the location of your in-home podcast ‘studio’
Obviously, everyone’s home is different and you have to make do with what you have. If possible, try to pick an area that is:
- Windowless, or doesn’t have many windows
- As far away from the street as possible
- Not close to appliances, like the HVAC system or fridge
- Least likely to encounter human and pet intrusions
These characteristics will help minimize the amount of noise your mic picks up, which also means less re-recording and editing you have to do in the future!
Things to help you minimize noise
It’s understandable that you won’t have the “perfect” podcasting room in your house — something that meets all the criteria mentioned above. Luckily, there are some common, everyday items that can help improve the space you do choose. You probably have some of these already and they go along way to helping create a better recording environment:
- An acoustic screen and other sound-absorbing panels
- Thick area rugs or carpets
- Curtains, drapes, comforter and blankets
- Clothes (which is why a closet is usually a good recording space!)
The Podcast Host recommends covering the floor with thick heavy rugs, hanging drapes over all the walls and windows and even putting a duvet over your head.
“This sounds stupid, but if it’s at all practical (and you don’t overheat), then your recording will benefit greatly,” Colin explains.
Once you choose your space, test it out. Set up your mic, put your headphones on and record a few minutes of audio. There are sounds you might not be aware of until you do this.
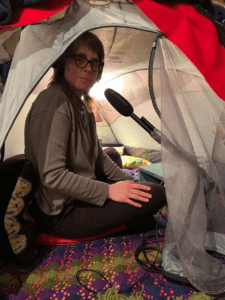
Again, don’t try to replicate a professional studio. Even the pros are making do with what they have at home. For example, Kate Linebaugh, co-host of The Journal (a WSJ-Gimlet podcast), has been podcasting from her basement — inside a tent — during the pandemic. Gotta love what podcasters will do to sound good for their audience!
Well, there you have it. You see? Creating the five-star remote recording setup isn’t so intimidating after all. Good luck — and happy podcasting!
Considering using SquadCast to record your remote interviews? Give us a try with our 7-day free trial!
Zachariah Moreno is the co-founder, CEO, & CTO of SquadCast. He is also a podcaster, author, developer, and designer. He and his team are on a mission to amplify collaboration.