
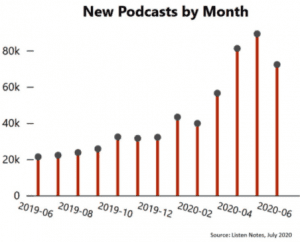
The pandemic definitely did not slow down the podcast industry. In fact, we actually saw growth when it comes to the amount of podcasts that were launched in 2020. Just 6 months into 2020, we saw more podcast shows debuting than we did in all of 2019. Based on Listen Notes data, by mid-2020 we saw almost 384,000 new podcasts launched and in all of 2019 we only saw about 274,000 podcasts launched.
So we can safely say that podcasting became quite a popular hobby during the pandemic. Because of this, more and more people are starting to learn the ins and outs of podcast production but from the comfort of their own home. So for all of you remote podcasters out there, whether you already have a show or you’re planning on starting one, here are 5 at-home recording tips.
Find the Right Microphone
If you already have a podcast, you might be covered with a microphone. But if you’re just starting (or maybe looking for a new mic to try out), there are some microphone features you should consider.
The first thing is a USB mic. This isn’t as much a feature but more the type of microphone you purchase. USB mics are definitely the easiest to set up and use at home. Simply plug it into your computer and just like that, your mic is set up.
The second thing to consider when recording your podcast from home is where it picks up noise. You want to look for a dynamic microphone with a noise pattern that focuses on picking up sound from the front of the mic rather than the back or all angles. This ensures that it’s picking up primarily your voice rather than any background noise you may have (which we all know is a difficult thing to avoid when working from home).
One popular microphone that we see many podcasters using is the Blue Yeti. The Yeti has a “Cardioid Mode” which means that it’s only capturing sound from the front of the microphone (perfect for podcasting).
Find the Right Recording Space
Finding the best place to record your podcast in your home can be challenging, but not impossible. When looking for a room to record in you want to try to choose a room that has few or no windows. The reason for this being that windows are going to let in noise from outside such as traffic, birds chirping, your neighbours mowing their lawn, etc.
You also want to look for a room that isn’t too large. Rooms that are large with high ceilings tend to have more echo in them and results in poorer sound quality. You may also find this to be the case in rooms that are quite empty, they usually produce more of an echo as well.
And lastly, whatever room you’re in, make sure to not have your AC blasting or a fan turned on. This creates a constant low hum in the background of your audio which can be a pain to get rid of.
Remote Recording Softwares
Remote recording softwares are going to be your best friend when it comes to creating a podcast from home, especially if you’re recording with guests or co-hosts. Remote recording softwares are platforms that you can use to record your podcast in a centralized location with either just yourself or other parties.
These platforms are great to ensure that you and your guests’ quality is top-notch. It also makes it much easier to record your show. Squadcast offers a variety of features that make podcasters’ lives easier when it comes to remote recording! Some of our favorite features include their Progressive Uploads, Automatic Backups, Video Recording, and so many more.
Make sure to explore the different platforms to ensure that you’re using one that has the right features for you (i.e. video, dial-ins, audio formats, number of guests, etc.). But obviously, Squadcast is our suggestion 😉
Noise Reduction Effects
When recording from home it’s common that you will have some sort of background noise that you weren’t able to avoid during the recording. Or maybe your guests’ microphone is sub-par or they’re using their headphones mic (not the best quality). As a solution to these issues, depending on the editing software that you use, you can add noise reduction effects to your tracks to help denoise the audio. We highly recommend using these features and doing some research on your editing software to see how to apply them. An editing software that we love is Adobe Audition, which has numerous noise reduction effects for you to try.
Another alternative is buying plugins. Some noise reduction plugins are just pure magic. Although they can get pricey, these are definitely a good investment if you know that you’ll consistently have some audio coming in with background noise. There are a variety of plugins you can explore but Waves is one platform to check out what they have to offer in terms of noise reduction and other plugins!
Tricks for Better Quality Audio
And lastly, some tricks we have for a better sound quality at home. The first one is going back to microphones, make sure that the placement of your mic is correct. We’re constantly seeing podcasters using their microphones incorrectly and this results in poor audio. Read the instructions that come with your mic to ensure that you’re placing it correctly, have the right settings on, and that you know where to speak into (we know this sounds obvious but sometimes it’s not)!
And our last trick that we’ll leave you with has to do with your recording space. If you can’t find a good room to record in, check out your closets. We know this sounds odd, but closets are small, usually stuffed with items, and pretty closed in so it helps to keep the sound clear and crisp. It might not be the most comfortable recording spot but you’ll get the best quality from there! If you don’t have any closet space to use, putting a blanket over you and your microphone so you’re almost creating a tent for yourself will also help to keep in the sound (we know, this sounds weird as well but we promise it works).
Happy podcasting!
Zachariah Moreno is the co-founder, CEO, & CTO of SquadCast. He is also a podcaster, author, developer, and designer. He and his team are on a mission to amplify collaboration.